

Fully powered, high-density, EEG and fNIRS
with Brain Products and NIRx
by Eduardo Bellomo, Ph.D.
Scientific Consultant (Brain Products)
Curious about combining EEG and fNIRS for your stationary, lab-based research? If the answer is yes, then check out our step-by-step guide on stationary EEG-fNIRS setup with actiCHamp Plus, actiCAP slim/snap, and NIRScout.
Notes:
- The combination of Brain Products and NIRx, as shown here, is only an example. If you are using fNIRS equipment from a different manufacturer, the same principles apply.
- For detailed information on a mobile EEG-fNIRS setup (with LiveAmp, actiCAP slim/snap and NIRSport 2) click here.
Why EEG and fNIRS?
 In the last decade, cognitive neuroscience research has been characterized by considerable efforts in combining different brain monitoring methods in order to examine cortical activity more comprehensively. Thanks to their complimentary signal properties, the co-registration of EEG and fNIRS (functional near-infrared spectroscopy) has become increasingly popular because of its functional and practical advantages. On the one hand, EEG directly measures the brain’s rapid electrical activity. On the other hand, fNIRS is linked to the brain’s hemodynamic response, and, specifically, localizes the slower changes in oxygen metabolism that follow neural activation. In other words, EEG and fNIRS signals capture different events linked to the same neurophysiological activity and have complimentary properties: EEG has an exquisite temporal resolution (millisecond precision) but limited spatial resolution; fNIRS has a good spatial resolution (<1 cm) but limited temporal resolution (~4 to 6 seconds when considering time-to-peak activation).
These characteristics are particularly advantageous compared to multimodal recordings with other measurement techniques, because EEG and fNIRS signals do not interfere with each other, making data recording and analysis more straightforward than with other modalities (e.g. fMRI, MEG). While EEG is measuring scalp potentials, fNIRS uses light to measure cortical hemodynamic responses. Despite the absence of interference between the two technologies, users should nevertheless keep in mind that EEG-fNIRS co-registrations are still subjected to the same artefacts commonly discussed for individual (unimodal) recordings.
Classical lab-studies reinvented:
Stationary setup for high-density EEG-fNIRS
A previous article discussed a mobile EEG-fNIRS setup, which is ideal for researchers interested in wireless, dynamic and ecologically valid experimental designs. In the mobile setup we described earlier, the equipment was completely wireless and wearable, which is perfect for mobile brain/body imaging (MoBI) research; however, in this article, we will walk you through setting up combined EEG and fNIRS for stationary lab-based recordings. If your research involves classic lab-based designs, as well as full experimental and environmental control, you may be interested in a stationary, wired, EEG-fNIRS configuration. Specifically, we will focus on the hardware combination of Brain Products’ actiCHamp Plus with actiCAP slim/snap electrodes for the EEG part, and NIRx NIRScout for the fNIRS part. For your EEG recordings, the actiCHamp Plus affords you high-density recordings of up to 160 EEG channels, up to 100 kHz sampling rate and additional auxiliary channels; whereas, the NIRScout allows the flexibility to start with a smaller 8 source – 8 detector configuration all the way up to whole-head coverage, making this a very powerful combination for multimodal EEG-fNIRS recordings.

Stationary EEG-fNIRS co-registration
Combining actiCHamp Plus with actiCAP slim/snap and NIRScout requires the integration of different pieces of hardware which are described step-by-step in the paragraphs below.
Montage design and cap setup
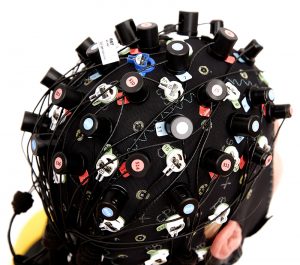 In order to combine EEG and fNIRS, we need a cap that is compatible with both types of sensors. The good news is that the actiCAP slim/snap electrodes and NIRScout optodes can be placed adjacent to each other according to the 10-20 system (Jasper et al., 1958) on the same EasyCap. Just make sure you have an EasyCap with enough slits to host both actiCAP snap holders and NIRx grommet bases.
For example, if you plan on using 32 EEG electrodes and an 8×8 fNIRS montage, it is probably best to have 96 or 128 slits. If you aim to have a higher number of EEG or fNIRS channels, it is probably best to go with a cap that has 160 slits. In general, the more slits, the closer EEG and NIRS channels can be to the scalp positions of interest. This might be relevant if, for example, you have a motor task and are using a motor cortex fNIRS montage. In this case, both EEG electrodes and NIRS optodes would compete for central locations (C3, C4, Cz, etc.), but enough slits would ensure the possibility of placing electrodes and optodes as close as possible to the motor cortex. It is up to you, the researcher, to define the desired montage design by deciding whether to prioritize placing an EEG electrode or a NIRS optode on the most relevant channel locations
You can create EEG-fNIRS designs by first defining the fNIRS montage according to the 10-20 system, with NIRSite 2.0 (NIRx montage design software), and then complement it by selecting the EEG montage based on the same 10-20 system, or vice versa.
Having a defined montage design is crucial because fitting the cap (with actiCAP snap holders and NIRx grommets bases) is a fairly time-consuming procedure that should be carried out prior to the arrival of the participant. Populating the cap follows the same procedure of any unimodal measurement. In our experience, it is more practical to first fit the cap with the NIRx grommets bases in the relevant slits on the EasyCap. Then, the actiCAP snap holders can be placed according to the desired 10-20 system locations, and the actiCAP slim electrodes can be “snapped” into the holders (the procedure is described here or you can check this video).
Checking the signals
Once the montage is defined and the cap is fitted, it is time for your participant to wear it. This procedure is the same as a normal EEG cap setup followed by an fNIRS cap setup. We would recommend first starting to reduce the impedance of the actiCAP slim electrodes with the use of BrainVision Recorder (click here for a detailed description or check this video). Then, the NIRx optodes can be fitted into the grommet holders and signal quality can be checked in NIRStar.
Triggering and event synchronization
Triggering and event synchronization are crucial to any type of co-registration since they allow you to precisely mark both your EEG and fNIRS data for online and offline analysis. When it comes to wired systems, triggers can be sent simultaneously to both the actiCHamp Plus and the NIRScout by means of the combination of two additional pieces of hardware: Brain Products’ TriggerBox and NIRx Parallel Port Replicator. The TriggerBox allows to receive the trigger from an external source (either from the stimulus presentation computer via USB, but also from another device such as a TMS stimulator, via BNC connector), and forward it with millisecond precision, from the “Amp” output port, to the Parallel Port Replicator, via the included DSUB25-to-LPT cable. At this point, the Parallel Port Replicator reproduces the trigger and forwards it to the actiCHamp Plus and to the NIRScout, via the respective Trigger Cables, as outlined in the schematic diagram above.
Data monitoring and recording
Data monitoring and recording happen in the same way as they would during any typical recording: with BrainVision Recorder for the EEG part, and with NIRStar for the fNIRS part. Since the same triggers are now sent to both devices, you do not have to worry about anything else. Just set up your preferred monitoring view and make sure to start the data acquisition on both software before the experiment starts.
Data analysis
Once both EEG and fNIRS data have been recorded and marked with the same triggers, it is possible to analyse them separately with your favourite data analysis software2. On the one hand, EEG data stored in the .xdf file can be opened within MATLAB®/EEGLAB or Python and eventually be further converted into BrainVision Analyzer format (see here). On the other hand, the fNIRS data is saved as a plain text format as well as .nirs and .snirf which can be directly loaded into nirsLAB, Homer3 or NIRS Toolbox.
Conclusion
We hope you have found this content helpful and that you now feel equipped and ready to start with your EEG-fNIRS experiments. Do not forget to cite us in your next publication so we can see how you are using combined EEG & fNIRS in a stationary setting.