Setting up BrainVision Recorder for simultaneous EEG-fMRI
Dr. Tracy Warbrick
Application Specialist EEG-fMRI (Brain Products)
In this issue of our newsletter we have lots of exciting EEG-fMRI news for you, but sometimes it’s also good to go back to basics. We often receive questions from researchers regarding the quality of their data or the success of artifact handling procedures. Frequently, these data related problems can be traced back to the recording settings.
Abstract
 Recording high quality EEG in the MR environment starts with good preparation and an optimal setup. A crucial part of that setup is the recording software. In this support tip we show you how to set up BrainVision Recorder for simultaneous EEG-fMRI.
The recommended recording parameters for EEG-fMRI are given in the BrainAmp MR operating instructions, in this article, however, we give a little more information about why these parameters are important for your data. It’s useful to understand the factors affecting our EEG data acquisition so that we can choose appropriate recording parameters for our studies.
BrainVision Recorder Workspace
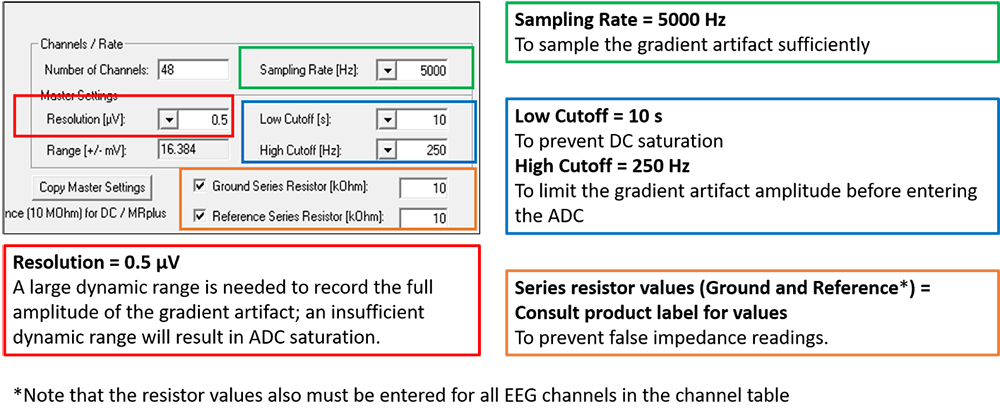
There are several recording parameters that influence the success of the gradient artifact correction. As such, the Recorder workspace is crucial to recording high quality EEG data in the MR environment. You only need to set up your Recorder workspace once for your study, it can then be saved and used for all recordings that require the same parameters. See Figure 1 for how the recommended parameters look when entered in the Recorder Workspace.

Figure 1: A summary of the BrainVision Recorder workspace parameters important for simultaneous EEG-fMRI recordings.
Sampling Rate
The maximum available sampling rate of 5000 Hz should be used. A high sampling rate is required to make sure that the gradient artifact is captured with sufficient temporal resolution to perform a good gradient artifact correction.
Resolution
The amplitude resolution determines the operating range for the analogue to digital converter (ADC). A large operating range is needed to record the full amplitude of the gradient artifact; an insufficient dynamic range will result in ADC saturation. For the BrainAmp MR plus and BrainAmp ExG MR you have several options available, we recommend using a resolution of 0.5 µV/bit (operating range ± 16 mV) for EEG recordings in the scanner. The BrainAmp MR has a non-changeable resolution of 0.5 µV/bit.
The other resolution options available for the BrainAmp MR plus and BrainAmp ExG MR can be used under exceptional circumstances. A resolution 0.1 µV/bit can be used for your EEG channels if you are recording in a scanner that has small gradient amplitudes that fit within the reduced amplitude range achieved with a resolution of 0.1 µV (±3.2 mV). A resolution of 10 µV/bit (operating range ± 160 mV) can be considered for the ECG channel if you are experiencing problems with saturation in this channel. The ECG channel is more prone to saturation because the lead wire is longer, thus creating a larger loop between the recording electrode and the reference electrode.
We recommend that you always do the first pilot recording with the standard 0.5 µV/bit resolution for all channels. Then check all channels for saturation and decide if any changes should be made. Further information on how to check the data for saturation can be found in our EEG-fMRI webinar.
Hardware filters
We recommend a low cutoff filter with a time constant of 10 s. In the BrainAmp MR plus and BrainAmp ExG MR you also have the option to record in DC (direct current) mode, this means that no low cutoff filter is applied. DC mode should only be used if you are interested in the very slow components of the EEG signal.
In case you do want to do DC recordings, there are a few things you should consider. The DC value of the EEG is the baseline around which the oscillatory signal fluctuates, this can change over time resulting in what is known as DC drift. This baseline can drift beyond the range of the amplifier and this results in DC saturation. This can be handled by performing a DC correction, however, there are two problems associated with this. The first is that DC correction might be forgotten, resulting in the loss of data from the saturated channel (the same as in a lab environment). Second, a DC correction results in an offset in the data which will influence the gradient artifact template used during the artifact handling process.
We recommend a high cutoff of 250 Hz. This is an amplifier hardware low pass and the purpose is to limit the gradient artifact before entering the ADC. While this is beneficial for EEG recording, keep in mind that this could be a limiting factor for signals such as EMG, where a broader signal bandwidth might be necessary. With a high cutoff filter of 250 Hz the available bandwidth is approximately 125 Hz. If you would like to do EMG measurements, you should consider whether your EMG response of interest can be seen within this range. If the EMG frequency that you are interested in is higher than 125 Hz you could try using a higher cutoff filter, however, note that this will result in more high frequency noise in the data which will influence how useful the recorded signal will be. Pilot testing your study is the best way to investigate the effects of the amplifier settings on your EMG data.
Series Resistors
Correct series resistor values should be entered in the Recorder workspace to prevent false impedance readings. These values can be found on the labels on the connector box of the BrainCap MR, or on the data sheet that is delivered with the cap. A standard BrainCap MR has the following resistor values:
- EEG channels have resistors of 10 kOhm (5 kOhm at the electrode tip and 5 kOhm at the connector box)
- ECG channels have resistors of 20 kOhm (15 kOhm at the electrode tip and 5 kOhm at the connector box)
However, you should check this information before entering it in the Recorder workspace in case you have an older, or customised, BrainCap MR.
Software filters
Raw Data Saving filters should be disabled. Low pass filters might obscure ADC saturation, and the induced phase shift, especially for high pass filter, may hinder gradient artifact correction.
Scanner interfaces
For simultaneous EEG-fMRI recordings two interfaces between the EEG system and the MRI scanner are required, both facilitate gradient artifact correction. In addition to the physical connection to the scanner outputs, it is necessary to make sure that Recorder is set up appropriately for these signals. You can find out more about why these interfaces are important by watching our webinar. Below we will describe how to check that they are working in Recorder.
SyncBox
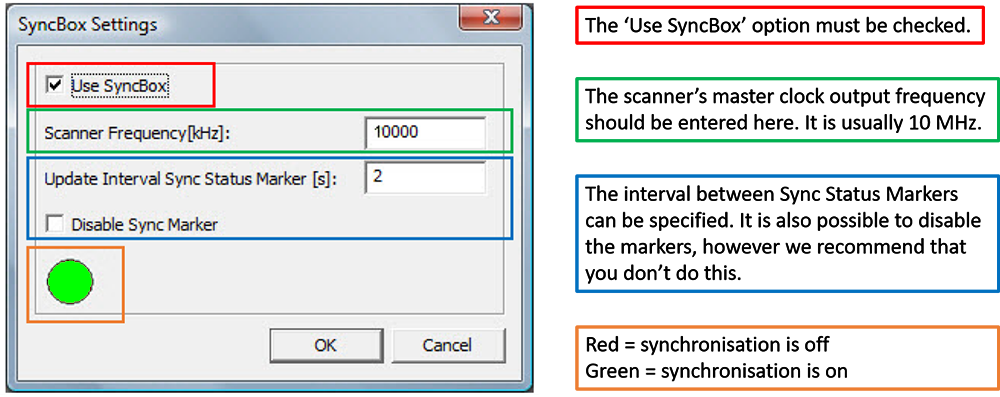
The sampling rate of the EEG data acquisition should be synchronised to the master clock of the scanner using a SyncBox. The synchronization status is indicated by a circle icon in the Recorder status bar, it is either red to indicate that synchronisation is off, or green to indicate that synchronisation is on. In addition, ‘Sync On’ or ‘Sync Off’ markers can be observed during recording and are stored with data (as long as markers are enabled). Figure 2 shows how to set up the SyncBox settings in Recorder.

Figure 2: The SyncBox settings in BrainVision Recorder. You can find the SyncBox settings by clicking on Amplifier > SyncBox Settings. Note that the amplifier must be connected and switched on to access the SyncBox Settings.
Volume triggers
To help with gradient artifact correction we need accurate markers for the beginning of each MRI volume (or slice). For this, we need to be connected to the scanner’s gradient system trigger output. The gradient system sends a TTL pulse at the start of each volume (or slice) and we can record this as a marker in the EEG. If everything is working correctly you will see the markers at the bottom of the Recorder window during EEG recording, they will be labelled as ‘R128’ if you are using the standard setup.
To make sure that the relevant bit (or digital input) is enabled you can open the digital port settings by clicking on: Amplifier > Digital Port Settings… Note that the amplifier must be connected and switched on to access the Digital Port Settings in Recorder.
Also note that the TTL pulse length needs to be at least one sampling point e.g. > 200 µs duration when sampling at 5000 Hz. If the pulse is shorter than one sampling point the pulse length must be extended. Ask your scanner technician about possible solutions locally, alternatively, a good solution here is the TriggerBox since it has a pulse stretching function. The TriggerBox is also useful if your scanner’s gradient system has an optical output; the TriggerBox can be used to convert the signal from optical to electrical.
Conclusion
We have explained which Recorder settings are important for simultaneous EEG-fMRI recordings and you should be ready to go ahead to record high quality data. If you would like to make any changes based on the suggestions in this article, remember to pilot test the new workspace settings prior to running an experiment.
Keep in mind that your data can also be influenced by the physical setup inside the scanner room and not only the amplifier settings in Recorder. You are welcome to contact our Technical Support team if you would like advice on improving your setup for EEG-fMRI or if you have any questions.

