

actiCAP active Electrodes Walkthrough
by Dr. Thomas Emmerling
Scientific Consultant (Brain Products)
The actiCAP active electrodes are widely used. They work with our actiCAP system, the actiCHamp, the V-Amp and the LiveAmp. In this article we provide you with a guide to the practical use of actiCAP electrodes. We add tricks and tips that help to make your recording sessions as smooth as possible. In case you have any further questions you can of course reach out to your local distributor or to our Technical Support team.
Overview
- Before the participant arrives
a. Washed hair and right clothes
b. Cap selection training
c. Pre-populate the cap - When the participant arrives
a. Cap selection
b. Populate the cap
c. Putting on the cap
d. Place the EOG, EMG or ECG electrode (optional)
e. Start the recording software and switch to impedance measurement
f. Gel application
g. Troubleshooting - After the participant leaves
a. Data saving
b. Electrode cleaning
c. Drying electrodes
1. Before the participant arrives
a. Washed hair and right clothes
Inform your participant to come to the EEG recording session with freshly washed and dried hair without any conditioner. This is important for good skin conductance and avoiding conduction bridges between electrodes.
Inform your participant to wear clothes that can become dirty in case any electrode gel gets onto the clothes. Also let them know that they will have to wash their hair (if you have the facility to do so) or that they will leave the lab with electrode gel in their hair.
b. Cap selection training
Train all your lab assistants to measure participant head sizes (circumferences). This will help you to obtain consistent measurements and cap selections across all of your lab assistants.
c. Pre-populate the cap
In studies with repeated measures or if a participant already took part in another EEG study in your lab you may already have the correct head measurements before the participant arrives. In this case you can save time in the recording session by pre-populating the cap before the session (see 2.b for instructions).
2. When the participant arrives
Caution: Always ask the participant to switch off their mobile phone.
a. Cap selection
If you do not know the head size already (see 1.c) you should start by measuring the head circumference of the participant. Choose the appropriate cap size and check how well it fits the head of the participant.
- There is a cap optimized for a different head shape: It is based on average head shape measurements from Chinese and Japanese populations. Ask your local distributor for the “Asia Cut” cap.
- You can find the cap size in centimeters on the small label that is attached to the back (occipital) side of each cap.
- If you measure a head size (e.g. 57 cm) for which you do not have a fitting cap (e.g. you have 56 cm and 58 cm caps), try a larger one (58 cm). If the cap does not produce any folds in the fabric when placed onto the head of the participant you can use it for the measurement.
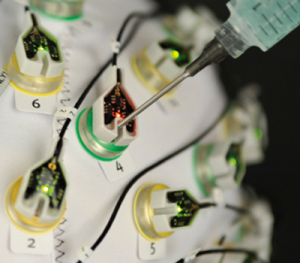
b. Populate the cap
While the participant fills out screening forms, questionnaires, or perform practice trials, you have time to prepare the cap: The easiest way to attach the electrodes to the cap is to make use of a Styrofoam head model. Take a seat on a chair and place the Styrofoam head between your knees with the face away from you. Fit the cap onto the Styrofoam head. Hang the actiCAP cable bundle over your own shoulder. This way you automatically attach the electrodes with their cables running to the back of the head. Start to attach electrodes in the holders of the actiCAP electrode cap at the back of the head. Work your way towards the front of the head. This will result in clean cabling on the cap (i.e. few crossing cables and little strain on cables during head movements).
Each electrode bundle consists of 32 numbered electrodes (1 to 32). The cap has colored holders for each bundle, that are labeled from 1 to 32. The colors and numbers help you to insert the electrodes into the holders and match the electrode bundles into the correct connectors. In principle, electrode bundles are exchangeable (before populating the cap) allowing you to quickly check and replace an electrode bundle between sessions in case of malfunction. However, the associations between channel numbers and color groups are rigid. Therefore, marking bundles with the associated color is good practice and prevents errors while plugging in the ribbon connectors. In addition to the normal electrode holders, there is a black holder for the ground electrode and a blue holder for the reference electrode (available in all actiCAP systems, LiveAmp systems, and new actiCHamp systems).

Figure 1: color codes (left) and montage (right) in actiCHamp caps.
Example: The bundle that you connect to the first amplifier slot corresponds to the color green. Consequently, you must insert the electrode numbered 1 of this bundle into the green actiCAP holder which is also numbered 1. The second bundle corresponds to yellow, i.e. you insert the first electrode of the second bundle into the yellow actiCAP holder which is numbered 1. As an example, please see the actiCAP 96 montage on the right hand side of the figure (above).
c. Putting on the cap
Before you mount the cap, put a hair dressers robe or a towel around the shoulders of the participant. This protects their clothes from any spilled electrode gel.
When you are ready with the attachment of the electrodes, place the cap onto the head of the participant following your lab’s standard procedures (as a reference, see Luck, S. (2014). An introduction to the event-related potential technique. Chapter 5. Basic Principles of ERP Recording. MIT press).
Tips:
- In case of a sub-optimal fit of the cap due to individual head shape variances, you can make use of Surgilast wrapping (www.dermasciences.com) or an elastic “Sports-Pre-Wrap” band to fixate the cap after you are done with the electrode preparations.
- If the participant has long hair make sure that not all hair is put behind the ears as this may make the preparation of temporal electrodes very difficult.
- Not all hair has to go under the cap – it is OK if there is some hair on the forehead. However, it should not cover the eyes of the participant.
d. Place the EOG, EMG or ECG electrode (optional)
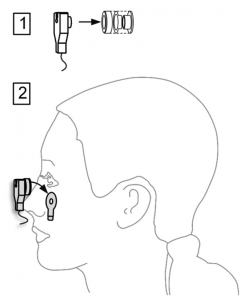 You can also use the electrodes to acquire EOGs, EMGs or ECGs (please also see “Recording EOG signals with actiCHamp“). When doing so, use the supplied actiCAP holders (see figure on the right):
- insert the electrode in the holder
(see 1 in the figure on the right) - fix an adhesive ring to the electrode holder and then apply the holder to the required part of the body
(see 2 in the figure on the right)
There are also flat actiCAP electrodes available (without holder) for EMG measurement. They can be fixed quickly and easily with an 8 mm washer and without any holder between the housing and the skin. Please ask your local distributor.
e. Start the recording software and switch to impedance measurement
Here, we assume that you have set up your workspace correctly. For instructions on how to do so, please refer to the user manual of your recording software (e.g., BrainVision Recorder).
In the recording software, the first electrode of the first bundle should have the physical channel 1 and the first electrode of the second bundle should have the physical channel 33 (and so on).
Switch to impedance mode. The LEDs in the electrodes illuminate red.
f. Gel application
Even with active electrodes, impedances do matter (see Kappenman, E. S., & Luck, S. J. (2010). The Effects of Electrode Impedance on Data Quality and Statistical Significance in ERP Recordings. Psychophysiology, 47(5), 888–904. http:// doi.org/10.1111/j.1469-8986.2010.01009.x); however, in our extended experience, we found that impedances of up to 25 kOhm work perfectly fine. The traditional <5 kOhm criterion corresponding to passive electrodes is not needed. Reaching this level would take longer to prepare and, in our experience, you would not gain anything in data quality. Depending on how electrically noisy your environment is and depending on what data quality you need, you can even go much higher, for example up to 100 kOhm. In the long run, it pays off to take the time for testing ideal settings in a pilot session. You can (and should) change your desired target impedances in the control software so that the colors of the LEDs reflect your desired impedances (e.g., green is 50 kOhm).
Use a target impedance level that works best for your project/paradigm/population.

Start by filling the ground and reference (if applicable) electrode and electrode 1 in module 1 (physical channel 1). If you do not prepare these first – or not well enough – the entire impedance measurement becomes invalid.
Tips:
- Work from the back to the front of the head as electrodes in the back of the head usually take longer to get good impedances because of the amount of hair.
- Speak to your participant to hear what is comfortable/uncomfortable during the electrode preparation. However, only do so at the start and do not continue to ask about it once you have a ‚feeling‘ for the comfort of the participant. Otherwise, the increased level of attention towards the preparation procedure will make the preparation uncomfortable in turn. Try to keep the participant distracted during the preparation (e.g., play a movie).
- Participants with little or no hair often have tougher skin on the head. This can (counterintuitively) make it more difficult to achieve low impedances with bald participants.
This is the general procedure to fill an electrode with gel
- Carefully push the blunt needle through the electrode aperture as far as the participant’s skin. Angle the needle to target the skin area directly beneath the electrode sensor.
- Gently move some hair to the side by pushing the tip of the needle side to side.
 Lift the syringe up just slightly (otherwise the blunted needle will be covered by the skin and no gel can come out).
- Use the nozzle to apply a small amount of gel (0.2 to 0.3 ml).
- Spread the gel with circular motion of the needle on the scalp. Remember, impedance is inverse to area. Double the area equals half the impedance. But do not overdo it, you want to avoid bridges between electrodes.
- Slowly retract the needle and as you retract, inject enough gel, so there are no air pockets left where the needle was.Such air pockets would lead to bad contact between pin sensor and the scalp (this step is usually the one that takes some practice since often there is too little gel applied when removing the syringe).
- Prepare until the LED in the actiCAP electrode turns orange (double the target impedance). Let it sit and continue with the next electrode as it will become green by itself (target impedance). Typically, the water and salt in the gel will improve the impedances over 3 minutes to half of their value.
- After all electrodes are done, quickly inspect the cap. If there are still amber/orange electrodes repeat steps 5 and 6 and slightly press onto the electrode to push any air pockets out and spread the gel some more on the scalp.
This may sound quite complex but, in reality, you will develop motor habits quickly and the process becomes like “1 – 2 – 3 – finished” while you do not even have to think about what you are doing. In that sense, it is like riding a bike.
Preparation time vs. data quality
Our recommended gel, SuperVisc, is one of the most viscous (non-fluid) among our electrode gels: it takes some time to prepare but provides the best data quality and longest recording time. Depending on your research project, very short preparation times might become relatively more important (clinical population, infants, etc.). In such cases, it is important to know that you can trade in a bit of data quality for an even faster preparation time. By diluting the SuperVisc gel with up to 30% water you can make it much more fluid which will speed up preparation time as impedances drop faster. This comes, however, at the increased risk of creating bridges between electrodes (especially in high-density recordings).
g. Troubleshooting
Our electrodes are very sturdy and do not break easily when handled appropriately (see 3.b and 3.c). If you do not get good impedances with a certain channel and wonder whether the electrode is broken, there is an easy way to check:
- Make sure that you get a good impedance on a neighboring electrode.
- Fill the neighboring electrode and the problematic electrode with ‘too much’ gel so that there is a small amount coming out of the aperture in the electrode.
- Put a stripe of gel onto your finger (or some wooden spatula for example) and touch both electrodes with it to create a temporary bridge/connection.
- If the impedance of the problematic electrode becomes better, you know that you need to further prepare the electrode. If, however, the impedance stays bad, there is likely a technical problem with the electrode and it needs a replacement. Don’t worry: you can easily replace single electrodes within 5 minutes; just follow our guide.
3. After the participant leaves
a. Data saving
This is not part of handling the actiCAP system; however: copy your data first (USB drive, network share, etc.) before continuing with anything else! Do not forget behavioral data from your presentation software.
b. Electrode cleaning
We advise cleaning the electrodes directly after the recording session as the cleaning process becomes much harder when the gel dries out on the electrodes.
Take a plastic pasta strainer/colander and put it into the sink. Put the cap with the still attached electrodes into the pasta strainer/colander. Soak the cap and electrodes under flowing water and pull the electrodes by the housing (not the cable) out of the holders while water is still running. The easiest way to do this is by using the electrode removal tool (available from your local distributor).
Detached electrodes can be cleaned easily: put the electrodes in the pasta strainer/colander and into the sink. Hold the electrodes, one by one, under the running water. If there is no tap insert/faucet aerator installed, free falling water of about 20 cm is enough to clean the electrodes of the gel quickly. The use of a pasta strainer/colander serves two purposes: it prevents any hard drops of the electrode tips and contact with any non-precious metals (if you have a stainless-steel sink) that could lead to the formation of an alloy.
c. Drying electrodes
Do not dry the caps and electrodes with a blow dryer. These devices can be hotter than one would assume. While the electrodes can sustain some heat, the caps can be quickly damaged with a hairdryer. Although the cap appears only warm to the touch, it can be locally overheated. This damages the Elastan-component and shortens the lifetime of the caps. Instead after drying with a towel place them on a rack or something similar. Again, pay attention to the splitter box: no remaining moisture from the electrodes should be able to run down the cables into the splitter box.
Disinfection
Simply washing and drying the caps will be sufficient for most applications. However, it can occur that your institution and/or the participant population make cap and electrode disinfection mandatory. There are different solutions.
All disinfectants will act aggressively on the Elastan-components of the cap fabric, so it is surely worth choosing a disinfectant as mild as possible to rubbers, soft plastics, etc.
On the other hand, even an aggressive disinfectant will not destroy the cap within a few applications; however, it will accelerate the aging of the fabric. The good news here is that electrodes and holders remain in good working order and only the fabric of the cap must be exchanged.
The electrodes can handle more aggressive disinfectants. Still, they can get damaged if they are left in any disinfectant for a very long time. Soaking them over night is not a good idea – doing so every night can destroy them in a couple of weeks.
A good way to choose a disinfectant is to look for products with the description “disinfectants for instrument disinfection with corrosion inhibitor”. For example, the disinfectant we recommend for Germany contains Cocospropylendiaminguanidiniumacetat and Didecyclox-etylmethylammoniumproprionat as active agents. Many of our US customers use Metricide or Envirocide without any major complaints.
Another note on ‘visual‘ cleanliness: lack of bleaching components and the frequent encounter of facial makeup leads to stained caps. Some hospitals use bleaching disinfectants and people complain that the disinfectant we recommend does not make things nice and white again.