Tricks and Tips in BrainVision Recorder – Part I
by Dr. Tracy Warbrick
Scientific Consultant (Brain Products)
 Our Analyzer 2 ‘Tricks and Tips’ support articles were very popular with our users. So, we have put together some more ‘Tricks and Tips’ for you, but this time it’s BrainVision Recorder’s turn. Here we present ten handy hints to help you get the most from your Recorder software.
Overview
- Need to quickly check your workspace settings?
- Do you want to customise the scaling of your display?
- How to display physical channel number in impedance mode
- How to make sure that impedance values are saved in the header file
- Do you want to apply a baseline correction to your data display?
- Want to add a quick note to your data file during recording?
- Can I predefine annotations to use during a recording?
- Importing electrode positions from an electrode position file
- How to assign incremental file names and prevent that files are overwritten
- How to view a single channel during recording
Need to quickly check your workspace settings?
You can display your workspace settings without having to open the workspace wizard. You can simply click on the Show Workspace Info button in the toolbar. This will open a window containing your workspace settings. It is worth noting that this button also works during recording.
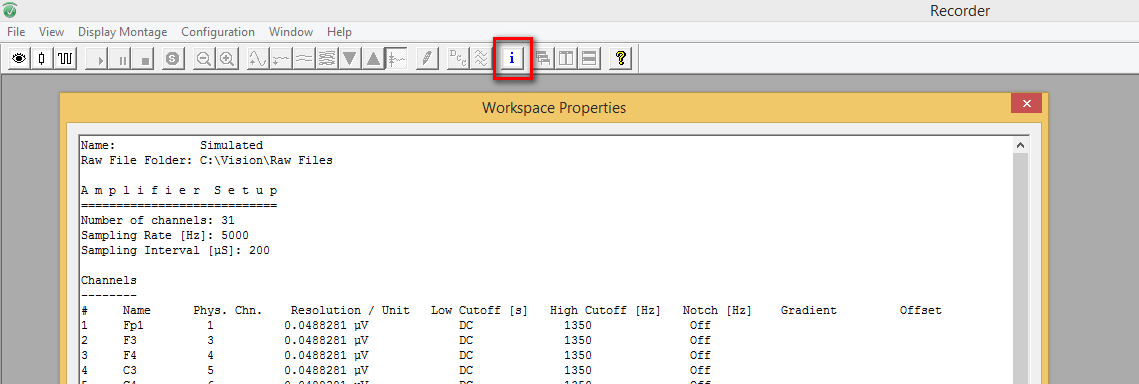
To check your workspace settings click on the Show Workspace Info button.
Do you want to customise the scaling of your display?
You can do this by clicking on Configuration > Preferences. A window containing a number of tabs will appear. Select the Scaling tab to adjust the display amplitude. Here you can select the polarity, activate the display baseline, and set the default amplitude scale. You can also set scaling factors for individual channels and for tabs in Scientific View.
To customise the temporal display interval you should select the View tab. Here you can specify how many seconds of data you wish to see on the screen.

In the Preferences window select the Scaling tab to adjust the display amplitude settings (left). In the Preferences window select the View tab to customise the temporal display interval (right).
How to display physical channel number in impedance mode
Would you like to see the physical channel number as well as the channel name in impedance mode? You can do so by clicking on the Settings button on the right side of the impedance mode display. A settings window will open and you should check the box Display Physical Channel Number.
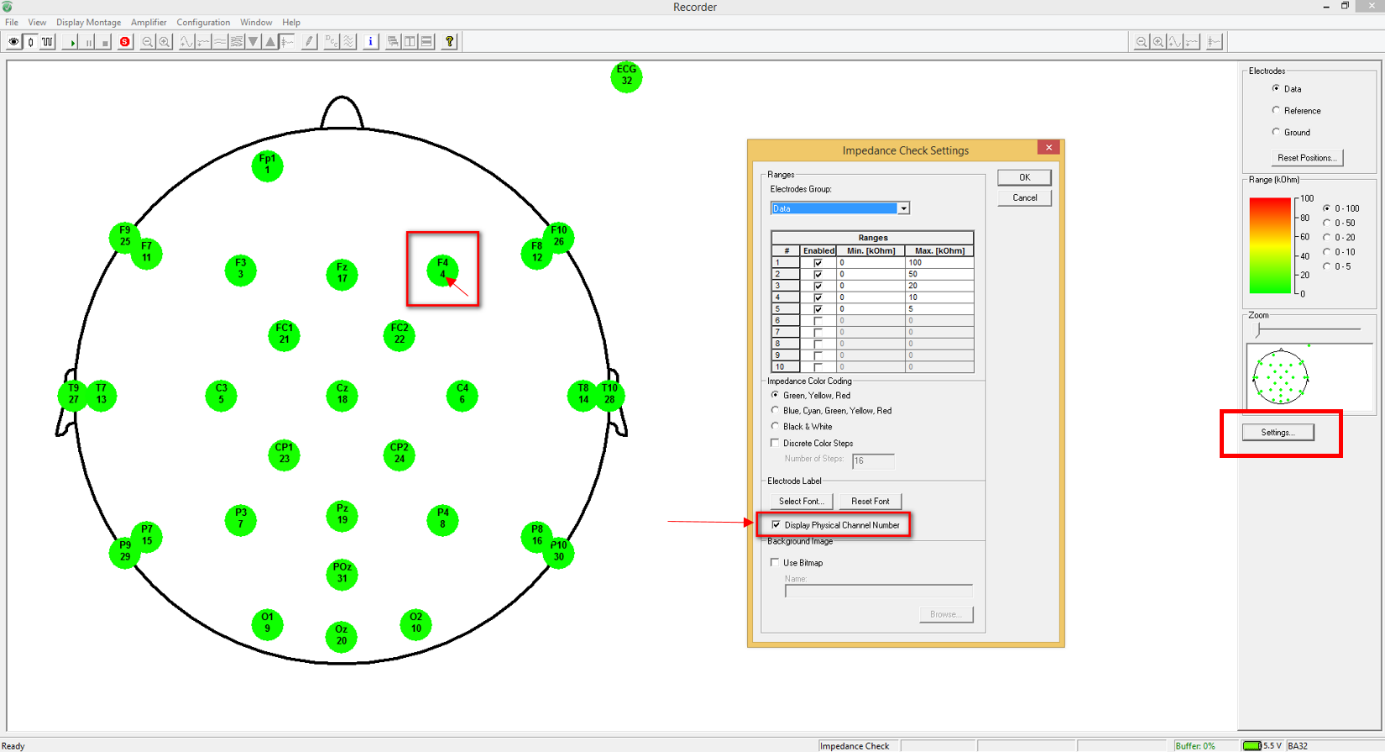
Check the option Display Physical Channel Number in the Settings window of impedance mode to show physical channel numbers as well as channel names.
How to make sure that impedance values are saved in the header file
To save impedance values in the header file (.vhdr) of your EEG recording make sure you always follow these five simple steps:
- Perform an impedance check, do not close Recorder
- Start monitoring mode
- Start the recording
- Stop the recording
- Stop monitoring mode
It is important to remember that you must not close the Recorder software between steps 1 and 2. You should also remember to stop monitoring mode before closing Recorder at the end of your measurement.
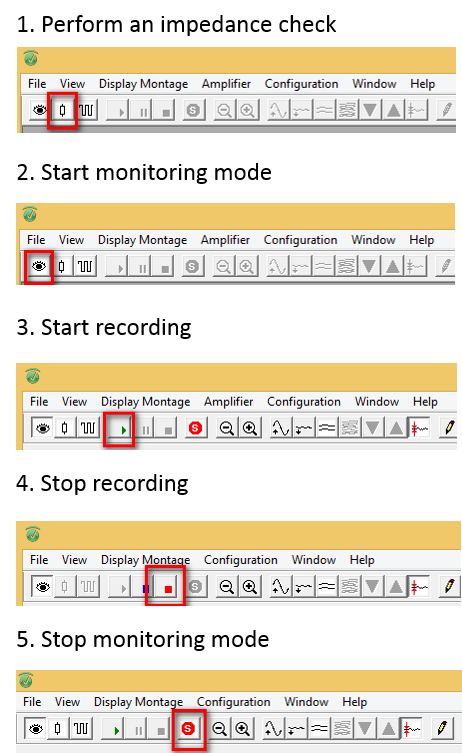
Follow these five steps to make sure that impedance values are saved in the header file (.vhdr).
Do you want to apply a baseline correction to your data display?
There’s a button for that! The display baseline can be activated or deactivated using the Baseline Correction in Display button. When activated, any offset is removed from the data and they are displayed offset-free. Note that only the baseline of the display is changed, the data that are saved to disk remain unchanged.

Baseline correction of the displayed data can be activated and deactivated using the Baseline Correction in Display button.
Want to add a quick note to your data file during recording?
This can be done using the Annotation button. When you click on the Annotation button a comment marker is placed in the data at that specific time point. A window then opens allowing you to add free text. Whatever you type here will be associated with the comment marker. Because the marker is placed at the time of clicking the Annotation button, you do not need to rush to add your text.
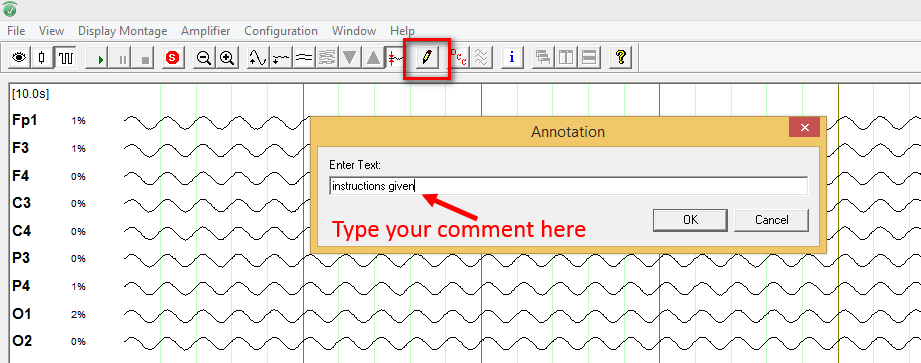
Click on the Annotation button to place a comment marker in your recording. You can add text in the window that opens.
Can I predefine annotations to use during a recording?
Yes you can! It is possible to predefine annotations that are relevant to your experiment. This makes it quick and easy to add them to your recording. You can do so by clicking on Configuration > Predefined Annotations. This opens a window that will allow you to assign comments to specific number keys on your keyboard. You can define up to ten annotations. They can be added to your recording by pressing the corresponding number key.
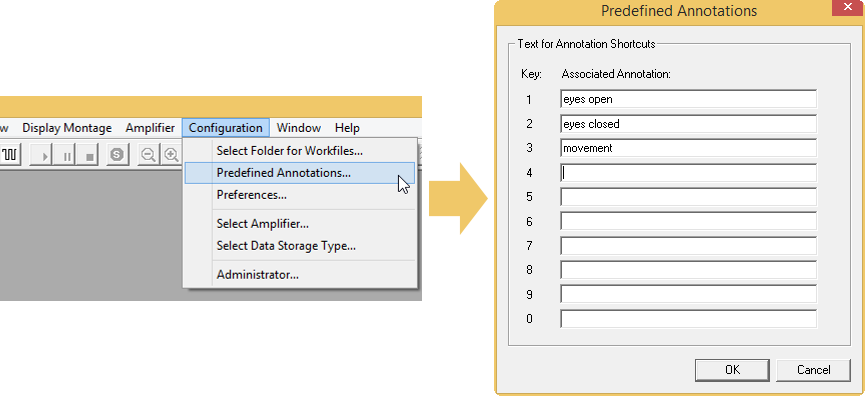
Click on Configuration > Predefined Annotations to assign comments to specific number keys on your keyboard. You can then add these comments to your recording by pressing the corresponding number key.
Importing electrode positions from an electrode position file
BrainVision Recorder and BrainVision Analyzer 2 are pretty smart. They know the theta/phi coordinates for all electrodes named in the 10-20 System (and its extensions). So, when channels are named following this nomenclature, both Recorder and Analyzer 2 already know the electrode positions. But what if a cap layout doesn’t follow this naming convention? Or what if you need to save the standard 10 -20 electrode positions in the header file? In this case, the Recorder workspace wizard allows you to import electrode positions. This is done by means of a Brain Vision Electrode File that has the extension .bvef.
On the second page of the workspace wizard, click on the Use Electrode Position File button. A new window will open. Here you can use the Browse button to locate the electrode file (.bvef) that you would like to use. Once you have selected the relevant electrode position file, click on the Import amplifier channel table button. This will make sure that the positions are imported into the channel table in the workspace.
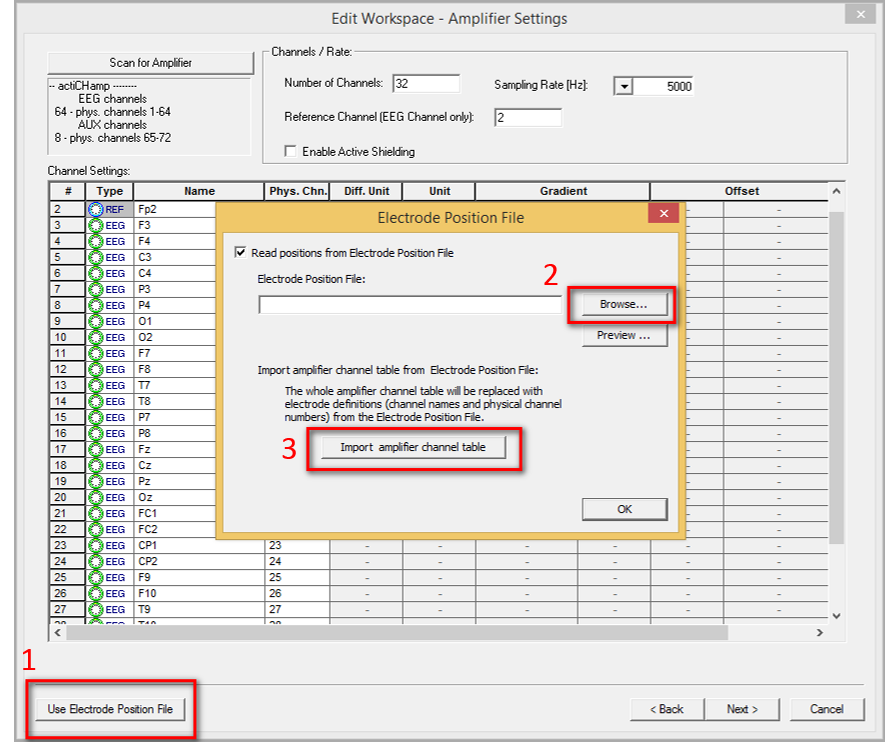
To import electrodes positions into your Recorder workspace go to the second page of the workspace wizard and do the following: 1. click on the Use Electrode Position File button, 2. use the Browse button to locate the electrode file (.bvef file), 3. click on the Import amplifier channel table button. Once you have completed these three steps click on OK to close the window.
How to assign incremental file names and prevent that files are overwritten
It is possible for Recorder to automatically assign a different name to each new file. This prevents files being overwritten. The name is based on parameters defined on the first page of the workspace wizard. Check the box Automatic Filename Generation and then fill in the relevant information. Choose a Prefix to be added to each file name, in this example I have used ‘My_experiment’. The Min. Counter Size should be specified based on the number of recordings that you plan to make. In this example I have been a little ambitious – unless you intend to run hundreds of thousands of participants you can choose a number less than 6 digits long! To generate a new file name, the prefix stays the same and the counter will increase incrementally each time a new file is saved.
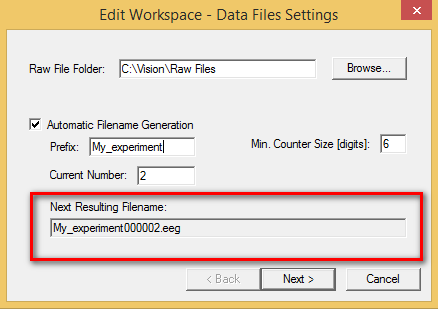
Check the box next to Automatic Filename Generation on the first page of the workspace wizard to automatically assign a different file name to each new file saved. The resulting filename is a combination of the Prefix and the counter. The counter will increase incrementally each time a new file is saved.
How to view a single channel during recording
If you would like to look at a single channel during recording double click on the channel name. This will display only that channel in the data window. This can be useful, for example, if you notice that a channel is becoming noisy and would like to take a closer look. To return to your original display double click on the channel name again. It is also worth noting that you can display multiple channels in a similar way. You just need to left click on each of the desired channels and then double click on last one that you select.
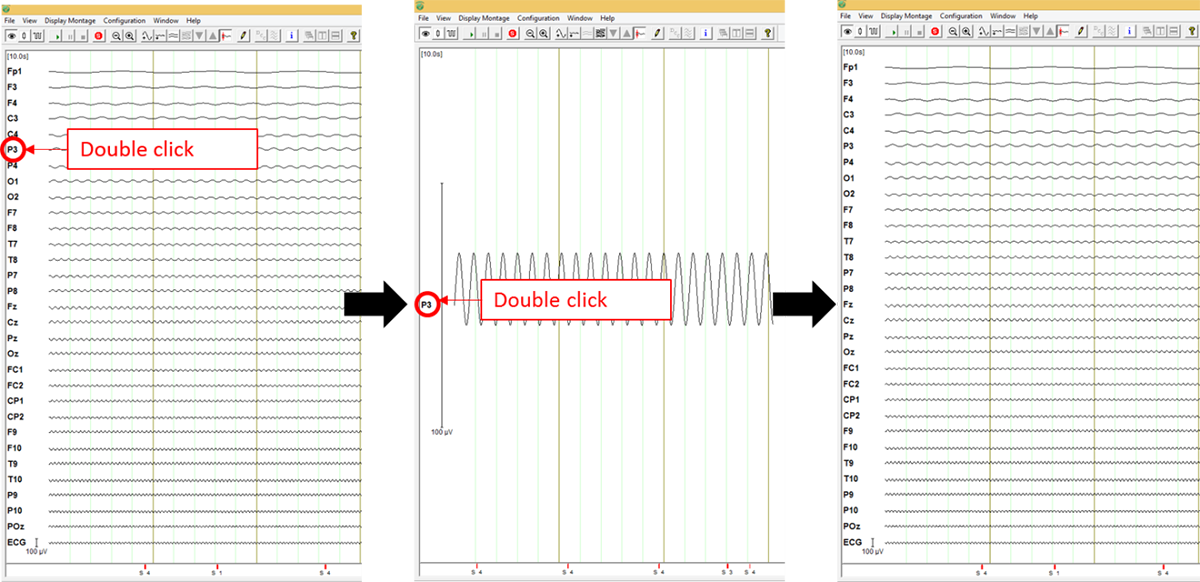
To display a single channel, double click on the channel name. To return to your original display, double click on the channel name again.

