

Keeping active electrodes fit and well: A guide for diagnosis and repair
by Dr. Stefania Geraci, Dr. Lena Beskers & Erik Gkaisarlidis
Technical Support (Brain Products)
Are you a user of the Brain Products active electrodes? Do you struggle to check whether your active electrodes are still fit for recording? Was it already suggested to perform a “saline test” but you are not sure on how to interpret the outcome of your test? This article might be ideal for you!
Introduction
Although very robust, the active electrodes are consumable products, therefore they will show signs of “wear and tear” after continued usage. An exact estimation of the electrodes’ lifetime is hard to define as it depends on several factors such as handling and cleaning procedures. Therefore, it is sensible to check your electrodes periodically to prevent issues while performing your recordings.
We want to guide you through the approaches to assess the status of your active electrodes quickly and efficiently, keep them fit and isolate possible malfunctions in advance of your next recording!
In our view, understanding the principles of the impedance measurement and signal recording is a necessary preliminary step and this will also be covered in this article. Moreover, if your testing shows that single electrodes or a ribbon cable need to be replaced, you’ll find below our video tutorial on how to replace them in your lab and reduce down-time for your study.
Active vs. passive electrodes
The fundamental difference between passive and active electrodes (Figure 1) lies in the approach to measure impedance values and in the transmission of the recorded signal.

Figure 1: A = standard multitrode electrode, B = “classic” active electrode with pin Ag/AgCl-pellet, C = more recently designed slim active electrode with flat Ag/AgCl-pellet, D = active dry electrode (actiCAP Xpress Twist).
Without going into the details of the electronics, with the passive electrodes the circuitries dedicated to the impedance measurement are integrated in the amplifier and measured impedances and the signal quality are in this case interconnected very tightly.
In contrast, each active electrode contains separate circuitries for impedance measurement and signal transmission. This fundamental difference has an implication that should be kept in mind while testing the active electrodes: the impedance measured for one electrode and the signal quality obtained with the same electrode are not necessarily linked together, if one of the two circuitries is damaged.
In other words, the impedance measurement and signal transmission circuits can be impaired independently! For this reason, the systematic test of the active electrodes is conducted in impedance mode and acquisition mode independently.
1. Preliminary check: Visual inspection
All our active electrodes use high quality Ag/AgCl-sensors, available in two variants: the “classic” with a pin-pellet (Figure 1B) and the more recent actiCAP slim with a flat pellet (Figure 1C).
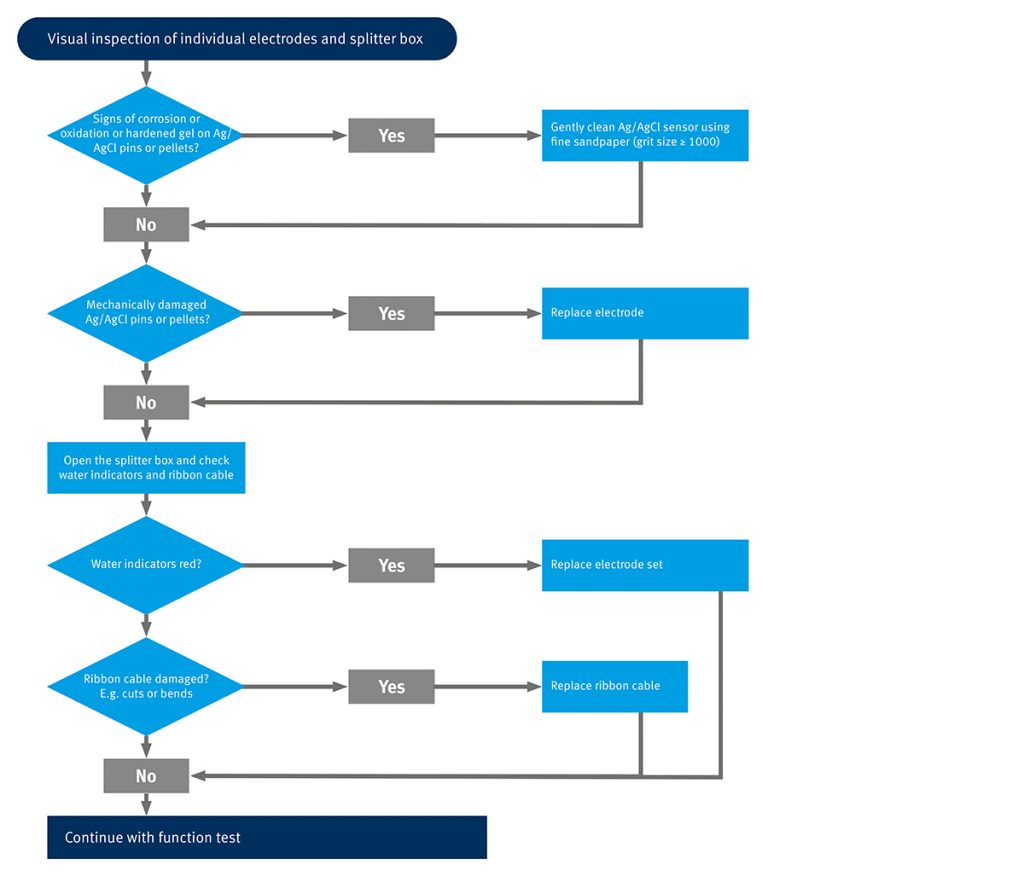
Click on image to download full flowchart as .pdf.
The actiCAP slim, available since 2017, is functionally identical to the “classic” variant. The newer design with a flat pellet (Figure 1C) protected by the housing of the electrode make them even more robust against mechanical damage. However, the visual inspection is recommended for this type of electrodes too, to check possible changes in color, or hardened gel residuals.
The visual inspection is also recommended for our dry electrodes, actiCAP Xpress or actiCAP Xpress Twist. In particular, check and exchange your QuickBits if you notice any abnormalities or change in color.
For every type of electrodes, check also the integrity of the electrode cables and of the ribbon cable connecting the splitter box to the amplifier/ControlBox.
As a last step of the visual inspection, open the splitter box and check the water indicators as shown in Figure 2. You can also see how this is done correctly in the video tutorial described in the next section of this article.

Figure 2: Removal of the screws of the splitter box on the left, water indicators inside the splitter box and on the circuit board.
We additionally provide with Figure 3 an example of how the water indicators appear with and without water-damage.

Figure 3: White water indicators (on the left) and examples of how the water indicators appear if a contact with water occurred (on the right).
2. Second step: Function test in impedance mode and acquisition mode
To conduct the function test, you will need to prepare in advance a saline bath: approx. 3 tablespoon of salt in 1 liter of water in a plastic bowl (do not use metallic bowls!).
All electrodes should be placed in the saline bath, ground and reference (where present) included. Make sure all electrodes are submerged and that the splitter box does not get in contact with water. The function test consists of separate testing procedures for impedance and acquisition mode respectively.
Impedance mode:
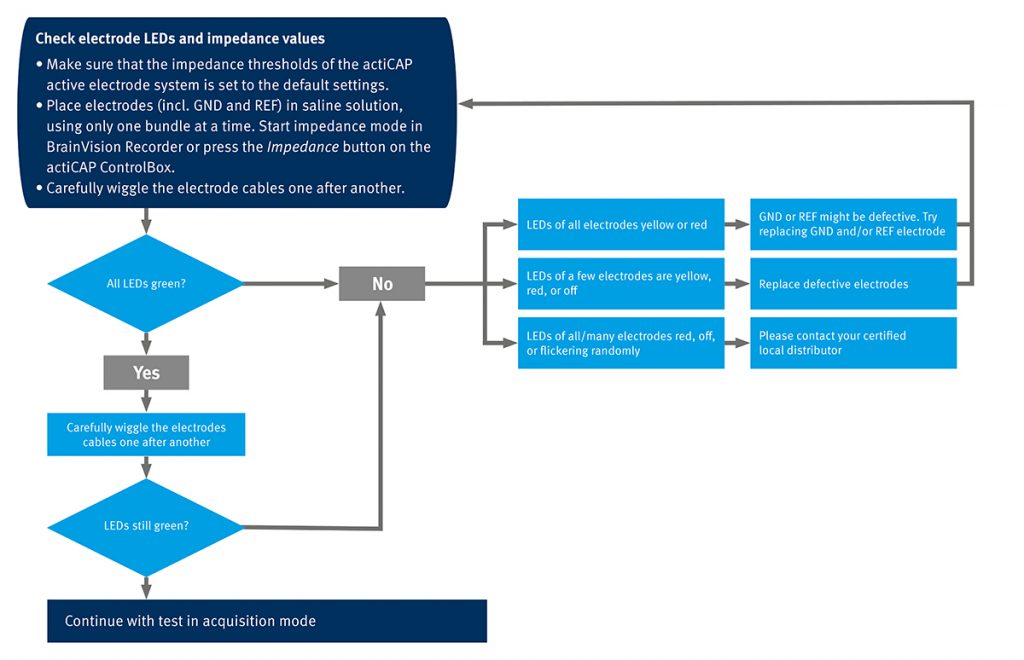
Click on image to download full flowchart as .pdf.
Acquisition mode:
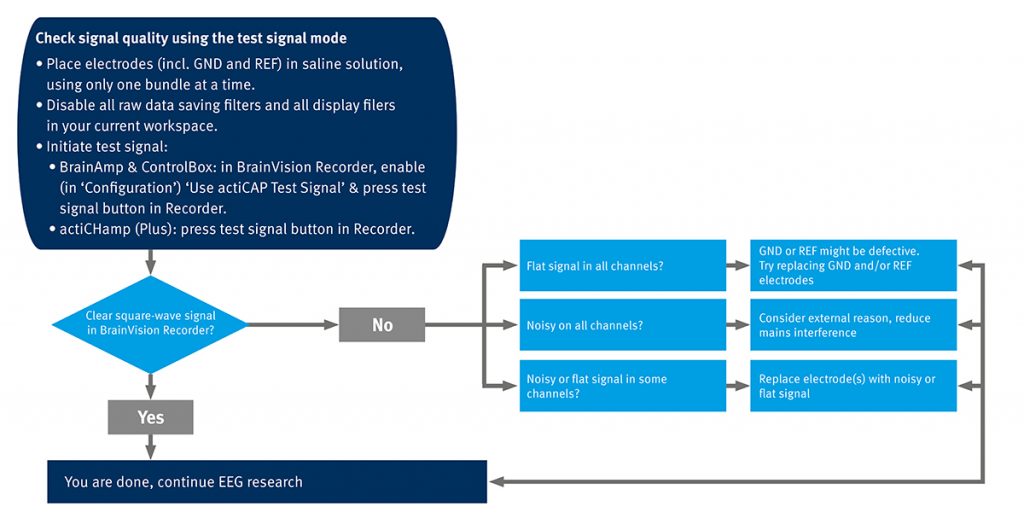
Click on image to download full flowchart as .pdf.
For further information on testing and maintenance of your active electrodes in saline bath, you can refer to the operating instructions of your system:
In our video tutorial, you will see how to

By loading the video, you agree to YouTube's privacy policy.
Learn more
Conclusions and final tips
In this article we have provided the steps for efficiently checking your active electrodes.
You can always get in contact with your certified Brain Products distributor if a replacement of electrodes and cables is needed. However, having spare electrodes and cables in your laboratory allows you to save resources and reduce down-time for your study. Our video tutorial guides you through the steps for the correct replacement of electrodes and/or cables.
‘Top tips’ for successful acquisitions with active electrodes
- Perform visual inspection and function tests in advance of your next recording to allow the time for possibly needed replacements.
- Every time you replace electrodes or ribbon cables, repeat the function test. Always keep spare electrodes at hand.
- Particularly important is having spare ground electrodes (and reference electrodes, if required with your system).